Tuesday, May 31, 2022

Migrating SQL Server to Oracle Cloud database offline

This blog covers the basic steps in migrating a SQL Server 2016 database to Autonomous Database 19c via SQL Developer migration tool offline


What I used:
  • SQL Server 2016 running on a Windows server in OCI as the source in online mode
  • Autonomous Database on Shared infrastructure as the target in offline mode
  • SQL Developer 21.4.3 running on the same server as SQL Server
  • SQL Developer documentation

Basic steps all within SQL Developer:
  • create connection to the source (SQL Server 2016) 
  • Setup migration repository,  I used a different schema within the target Autonomous Database
  • capture source information online
  • review convert/translate options for meta info, procedures, triggers, views, ...
  • select offline mode for DDL and data
  • run the job
  • after job is completed run the DDL, extract data from source and load the data to the target
Almost always you will use offline in which SQL Developer creates the scripts which you will use to move a production database.  Online is nice for testing.   

After creating connections within SQL Developer to the source and target as well as setting up the migration repository select Tools->Migration->Migrate.   


Step 1 -- Overview of migration steps

Step 2 -- Select migration repository
Step 3 -- Create project, note that this is where the scripts and
data will be stored so make sure you have enough storage
as well as where to place the files perhaps on a NFS mount
that both could access.

Step 4:  Select Source in online mode

Step 5:  Select Database(s)

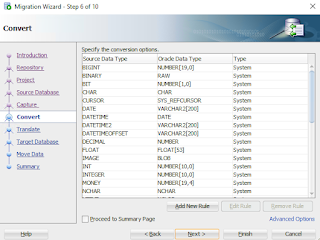
Step 6: Review data type convert options

Step 7:  Select Objects to migrate, default is all

Step 8:  Select offline to move DDL

Step 9:  Select data to be moved offline

Step 10: Summary and Start job to migrate

After the job is completed successfully you will want to run the scripts to create the DDL and copy the data to the target database.  

In the project directory you will find the DDL and data scripts

Run the master.sql script on the target which creates the DDL


These are the scripts to extract and load the data

command parameters are IP address of source database, 
userid and password to connect to source.  This command
exports the data from source database to files


command parameters are connect string , user and password
to the target database.   This commands loads the data from
the files to the target database.


Migrating SQL Server to Oracle Cloud database online

This blog covers the basic steps in migrating a SQL Server 2016 database to Autonomous Database 19c via SQL Developer online migration tool. 


What I used:
  • SQL Server 2016 running on a Windows server in OCI as the source
  • Autonomous Database on Shared infrastructure as the target
  • SQL Developer 21.4.3 running on the same server as SQL Server
  • SQL Developer documentation

Basic steps all within SQL Developer:
  • create connections to the source (SQL Server 2016) and target (Autonomous Database)
  • Setup migration repository,  I used  a different schema within the target Autonomous Database
  • capture source information
  • review convert/translate options for meta info, procedures, triggers, views, ...
  • create target
  • submit the job to create the DDL and move the data
Almost always you will use offline in which SQL Developer creates the scripts which you will use to move a production database.  Online is nice for testing.   

After creating connections within SQL Developer to the source and target as well as setting up the migration repository select Tools->Migration->Migrate.   

Step 1 -- Info on steps


Step 2 -- Select repository

Step 3 -- Create project


Step 4 -- Select source


Step 5 -- Select database(s) 

Step 6 -- Convert data types

Step 7 -- Select objects to be converted

Step 8 -- Select target 

Step 9 -- Select move data online

Step 10 -- Start job to migrate


After job is completed using SQL Developer to view the migrated objects and data.  Image below shows the source and new target. 


Tuesday, May 24, 2022

Connecting Oracle Analytics Cloud to an Oracle cloud database with a private endpoint

This blog is one example on how to connect OAC to an Oracle Cloud database with a private endpoint  using OAC's private access channel. The basic steps are:

  1. Use Oracle Cloud Infrastructure Console to configure a private access channel within your OAC instance.
  2. From your OAC instance create a data connection to the private database.
Refer to the documentation for all of the detail regarding setting this up, in particular the prerequisites. 

I used the following OCI Services:
  • Oracle Analytics Cloud (OAC) with the Enterprise Analytics feature.
  • Exadata Cloud Service (ExaCS) with an 19c pluggable database. 

Step 1 -- Creating private access channel

Using the OCI Console access your OAC instance, navigate to the Resources section, click Private Access Channel, and then click Configure Private Access Channel.


The private access channel above and the ExaCS were in the same private subnet which makes it easier.  Private access channel requires four IP addresses, two IP addresses are required for network traffic egress, one IP address for the private access channel, and one reserved for future use. 

After about 30 minutes you can click on the created private access channel and note the ip addresses it is using within the subnet. 

Step 2 -- Creating private access channel


OAC can't access private data sources on an Oracle Database that uses a Single Client Access Name (SCAN). If you want to connect Oracle Analytics Cloud to an Oracle Database that uses a SCAN, use one of the following methods to set up the connection in Oracle Analytics Cloudconnect directly to the Oracle Database nodes, instead of SCAN or configure an Oracle Connection Manager in front of SCAN.

From your OAC Home Page, click Create, and then click Connection,  and Oracle Database.

When using ExaCS the default connection strings all use SCAN.  Below are three examples connecting to a PDB on ExaCS that uses the compute node names instead. 


Basic connection to a single compute node

Advanced with long connection string
(DESCRIPTION=(ENABLE=BROKEN)
(ADDRESS_LIST= (LOAD_BALANCE=on)(FAILOVER=ON)
(ADDRESS=(PROTOCOL=tcp)(HOST=exacsphx1-8abcd1.sub1111112222.exacsvcnphx1.oraclevcn.com)(PORT=1521))
(ADDRESS=(PROTOCOL=tcp)(HOST=exacsphx1-8abcd2.sub111111222.exacsvcnphx1.oraclevcn.com)(PORT=1521)))
(CONNECT_DATA=(SERVICE_NAME=GFSwing_SCALE100.paas.oracle.com)))

Advanced with easy connection string
exacsphx1-8abcd2.sub111111222.exacsvcnphx1.oraclevcn.com:1521/GFSwing_SCALE100.paas.oracle.com


Thanks.